 Girl's Behavior
  Guy's Behavior
  Flirting
  Dating
  Relationships
  Fashion & Beauty
  Health & Fitness
  Marriage & Weddings
  Shopping & Gifts
  Technology & Internet
  Break Up & Divorce
  Education & Career
  Entertainment & Arts
  Family & Friends
  Food & Beverage
  Hobbies & Leisure
  Other
Other  Religion & Spirituality
  Society & Politics
  Sports
  Travel
  Trending & News
 Roasting a turkey is something that many people do poorly. The turkey gets cooked and everyone is polite and does not criticize . . . but it is dry. How often have you placed a slice of turkey breast on your plate and, without even tasting it, you covered it in gravy? You simply expect it to be dry and in need of some help to make it palatable.
This myTake will show you how to cook a turkey that is done but moist, tasty, and looks so beautiful that you will want to take a picture of it. There are a few tips and pointers in this myTake that will make a tremendous difference the next time you roast a turkey.
What you will need:
Turkey (duh!)
Cheesecloth
Butter
Extra Light Olive Oil (do NOT substitute extra virgin olive oil! Don’t!)
Turkey Baster
Turkey Lacing Pins
Twine
Meat Thermometer
Of course, the turkey needs to be thawed completely the day before you cook it. Don’t guess about the turkey being thawed by the feel of the exterior. Open the package just enough so that you can feel the interior of the chest cavity. After it is thawed, put it in the refrigerator overnight but take it out of the refrigerator as early as possible on roasting day. The closer your turkey is to room temperature when you begin cooking, the more evenly the turkey will roast.
Preheat the oven to 325º F. Wash the turkey and dry it with paper towels. At this point, many people would stuff the turkey. Don’t do that. There is a health concern that something as bulky as a turkey will not cook all the way through. The more mass there is to the turkey, the longer it will take to cook. Also, the turkey will cook more evenly if it is not stuffed. Cook that stuffing in a separate baking dish; no one will know the difference.
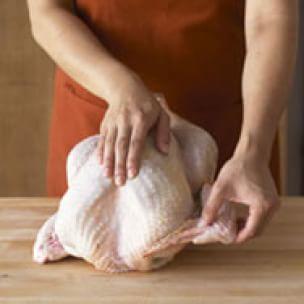
The next step is to truss the turkey. That means pulling the bird together and closing the openings on both ends. You can find many videos online that will show you how to truss a turkey. I do it my way because it’s the only way that I know and it works.
First, tuck the wings under the turkey.
On the neck end, two pins will hold the skin flap in place, covering the opening to the chest cavity.
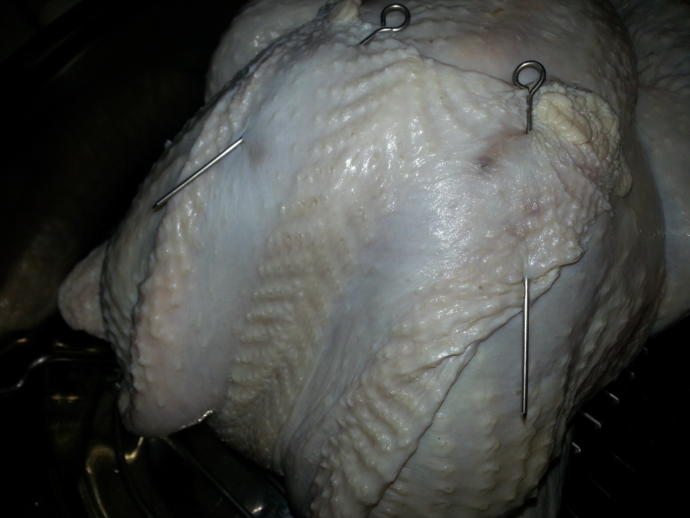
On the back end, I use three or four pins inserted at the edge of the opening on one side and then pushed through a corresponding position on the other side. You can then use the twine and lace the pins as you would lace the studs on boots. Then, tighten the twine until the opening is closed, and tie a knot in the twine to keep it in place. Finally, tie the two drumsticks together.
Place the turkey in a shallow roasting pan. A deep pan will prevent the turkey from browning on the sides and those parts will take much longer to roast. Yes, this really does make a difference! I discovered this “the hard way” this year when I did not have a shallow roasting pan available.

Now the magic begins. Melt one stick of butter in a microwave-safe measuring cup, then add an equal amount of extra light olive oil. Cut a piece of cheesecloth large enough to cover the entire turkey. Dip it in the oil/butter mix, wring out the excess, and place over the turkey. Tuck the excess under the edges of the turkey. NO part of the skin should be uncovered.

Now, use the baster to baste the top and sides of the turkey. Place the turkey in the preheated oven and set the timer for 15 minutes. When the timer alarms, briefly remove the turkey, baste again, and immediately return to the oven. Baste every 15 minutes for the first three hours.
Refer to the instructions with the turkey and determine the estimated roasting time. Using that time as a guide, remove the cheesecloth about 30 minutes before the turkey is “supposed” to be done. However, do not rely on that time to remove the turkey from the oven. Check both breast and thigh with a meat thermometer. The breast is done at 165 and the thigh is done at 180º F. This is what the completed turkey will look like:

This is a turkey that I roasted 2-3 years ago using this same method (with a shallow pan.)
Rely on the thermometer to tell you when the turkey is done. Most people overcook a turkey and that accounts for it being very dry. Let the roasted turkey stand for about 30 minutes before carving.
Here is why this method works.
1. The cheesecloth, trussing, and browning of the skin combine to seal in juices.
2. Using a thermometer helps to avoid overcooking the turkey.
3. The fat in the butter is what turns the reddish brown color. The extra light olive oil prevents the butter from burning. If you use extra virgin olive oil, it will impart an unwanted taste and it burns at lower temperatures.
4. Finally, the cheesecloth holds the basting juices on the turkey instead of them immediately running off and back into the pan.
If you follow this recipe, you should have success on your first attempt. Good luck!

Most Helpful Opinions