 Girl's Behavior
  Guy's Behavior
  Flirting
  Dating
  Relationships
  Fashion & Beauty
  Health & Fitness
  Marriage & Weddings
  Shopping & Gifts
  Technology & Internet
  Break Up & Divorce
  Education & Career
  Entertainment & Arts
  Family & Friends
  Food & Beverage
  Hobbies & Leisure
  Other
Other  Religion & Spirituality
  Society & Politics
  Sports
  Travel
  Trending & News
 GIVING A MASSAGE MADE EASY

GETTING SET UP
SUPPLIES and EQUIPMENT
Environment
You will need a six by nine foot (2 x 3 M) or larger space in a quiet area. You should have access to electricity for musical devices, heaters & lights.
Lighting
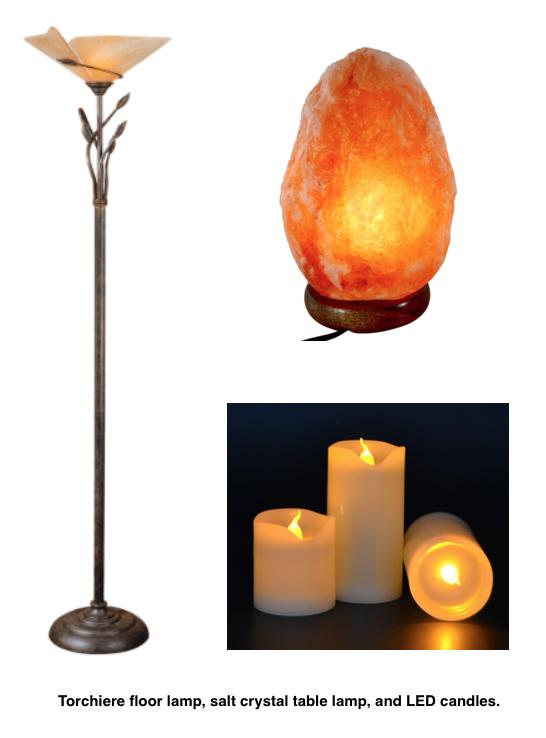
“Uplights” shine upward for indirect light. They are preferable to ceiling lights which shine down into the recipient’s eyes when face up. If possible, the lights should be on a dimmer. (Dim the lights when the recipient turns face up.). Other possibilities for gentle light are battery-LED “candles” & salt lamps.
Room heater
If the room is cold, you will need a heater to get the temp up to at least 75ºF (24ºC). An electric, oil-filled heater is preferable for it’s even, gentle warmth.

You might want to add a Massage Table Warmer. While somewhat similar to an electric blanket, it's placed under the bottom sheet and recipient. Do NOT use an electric blanket under a massage recipient. If you warm the table, use ONLY a Table Warmer made for the job!
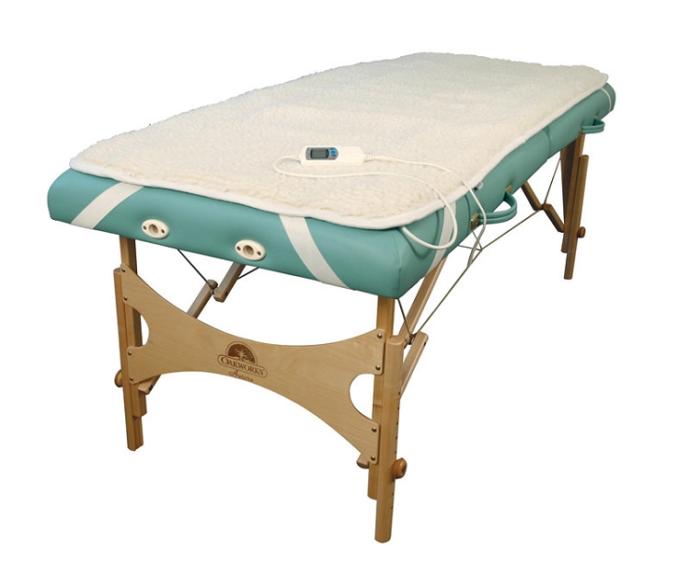
Table
You will need some sort of solid, well-cushioned surface on which the recipient lies while you give the massage. A massage table- built specifically for massage- is ideal. A workable substitute can be made from a banquet table with an inflatable air mattress and blanket placed on top. The table provides the stability and the air mattress the cushioning.
A fall-back would be a bed, but it has three major problems. 1. It will require moving the person receiving the massage so that the provider is working near an edge. 2. It is very soft compared to a table. The bed absorbs much of the massage pressure, so the person providing the massage must work harder. 3. A bed has a sexual meaning typically attached to its use, depending on the relationship between giver and receiver.
Note: If you are going to invest in a massage table, buy as high a quality table as you can afford and get one with an “active working weight” limit of 450+ #, and preferably 550+ #. Do NOT be misled by some brands (such as Master) that say their “working weight” is 1,500+ #. That is a STATIC weight, meaning it will support that weight only if spread evenly over the legs with no movement. That is not ACTIVE working weight, which includes the recipient’s weight, the provider’s weight, plus a safety margin for angular movements. Don’t say I didn’t warn you. :- )
Reputable legacy brands include: Custom Craft Works, StrongLite, OakWorks and EarthLite. I’ve owned a Master Bodyworker from CCW for 25 years and it still looks new! Disclaimer: I get no compensation from these or any other companies!

- 10+ year warrantee
- Maple or oak are better than beech which can split more easily.
- Birch plywood topboard
- Cushioning of 2.5”- 3.0”, layered with a denser core covered with softer foam.
- Face cradle holes at both ends of the table frame.
- A top of polyurethane (PU) or other material that is guaranteed oil and alcohol resistant!
- Avoid tables with a built-in face hole instead of a face cradle.
Extras you might consider getting:
- Arm and table extensions (for working on big people)
- Fully adjustable face cradle (great for advanced neck work, a feature I added)
- Rounded corners (aesthetics and safety, a feature I added).
Sheets
You will need 2 sets of sheets that will fit your massage surface. Most therapists use either made-to-fit sheets or a twin set of sheets. Resist the temptation to get fancy, 800-thread, all cotton sateen sheets: they are too slippery, and don't wash out as well. (I use 200-count, cotton-poly prints.) Stretch the fitted sheet over the table. Place the flat sheet over that, centered, ending with the sheet’s top hem and table end aligned. Use the pillow case with a u-shaped fold, a fitted cover, or a half-split paper towel to cover the face cradle.

Towels
(Quantities shown provide two sets, one set in use, and one in the wash)
2 bath towels (if being used) for draping
6 hand towels for wiping your hands free and for breast drapes (if being used)
6 face cloths moistened with hot water and wrung for wiping oil, spills, etc.
Bolsters
A 6” (15cm) diameter, 26”+ (66 cm) long (approx) rigid foam roller. A 6” diameter, 26”+ long soft bolster. Position a bolster under knees when face up, under ankles when face down.
Oils (in order of viscosity)

- Grapeseed is the lightest oil, the ONLY one for use on pregnant women, babies: it won’t harm babies if they suck on it and it's easily digested. It is very light & slick, used for light, relaxing work.
- Almond, jojoba, and coconut oils are fine medium-body oils for most relaxation massage. Olive oil is heavier bodied: use a few drops for deep work in specific areas.
- Warm pure cocoa butter is a great treat.
- Safflower and sunflower oils are acceptable, inexpensive oils.
- Avoid soybean oil (“vegetable oil” in food stores) as it spoils quickly.
- If you have Vitamin E capsules, puncture a few and squirt into your oil. It will provide longer shelf life for the oil, and antioxidants to the skin of the recipient.
- You may add 4 drops of essential oils (NOT perfume oils) to each 8 oz (240 ml) of massage oil. Lavender is good for relaxation, eucalyptus and peppermint are good for muscle aches and stuffy breathing, while tea tree is a good anti-bacterial. Shake or stir well before using.
Notes: Have baby oil on hand since some may be allergic to some food oils. If you use lotions or creams, expect them to be absorbed quickly, requiring periodic additional applications.
Music and Miscellaneous
A source of calming music provides even more relaxation. Spa music, smooooth jazz, nature sounds, etc., are obvious choices to provide that extra layer of relaxation.
Some people like to burn incense or use an oil diffuser. If you do, use a fragrance that matches the nature of the session: relaxation=lavender; uplifting=lemon; energizing=mint or eucalyptus; exotic=vanilla, sandalwood, or ylang ylang.
“BASICS 101” of MASSAGE
DRAPING
Draping is the “covering of the recipient’s body for warmth and modesty”. Start with full sheet draping. The entire body up to the neck is covered with a sheet. As you come to an area to work, uncover only that area, massage that area, redrape, and proceed to the next area. To work arms, uncover up to the shoulder. To work back of legs, uncover up to the hip.

To work the back, uncover to the gluteal cleavage. In the beginning, you might want to practice undraping and redraping on your partner while they wear gym clothes until you are comfortable with the technique.
If you will be doing abdominal (never on a pregnant guest!) or breast massage, you will have to learn how to ”slip sheet”. Assume your female client is face up, with a sheet covering her body up to her neck. Place a folded hand towel crosswise across the breast area. Hold the top of the towel in place on her body while you slip the sheet out from under the towel down to her midriff, keeping the breasts covered.

Fold the towel back exposing one breast, massage, redrape. Repeat on the other breast. If you are also going to be doing abdominal work, continue folding the sheet down to a palm-width under the navel, massage the abdomen in a clockwise pattern, redrape the abs, and continue redraping by unfolding the sheet upward until her breasts are covered. Anchor the sheet on her body and slide out the towel. Again, you may want to practice slip-sheeting techniques on a partner who is dressed until you gain confidence and are comfortable with the technique.
If you will be using a large towel as a drape on males, use it crosswise on both the front and back- across the hips- of the body. If working on a female, use it crosswise over her hips on the backside, and lengthwise over her whole body on the front. If doing breast and/or ab work, slip sheet with a smaller towel as explained.
INDICATIONS and CONTRAINDICATIONS
When you give a massage, reasons that the massage should be performed might be that the person has tension in their neck, or needs to have blood circulating more easily. These are two of many reasons- which we call indications- that the person SHOULD receive massage.

Sometimes, a person should NOT receive a massage, either over their whole body or a specific, localized part. This is a contraindication. This is just a fancy word to call the reasons that you should NOT massage a person, on a permanent or temporary, full or local body area basis. Here are some examples:
If someone has a contagious disease, that would be a temporary/full contraindication. If they have a broken arm, or a cut on the arm, that would be a temporary/local contraindication since you could still perform leg, hip, and back massage. If someone has a pacemaker, they would have a permanent/local contraindication for the chest area. If someone has been hospitalized several times with heart failure and the doctor does not approve massage, then that would be a permanent/full contraindication.
MASSAGE SEQUENCE
The presence or absence of a good flowing sequence can make or break a relaxation massage. Maintaining body contact once touch is initiated is desirable, but do not do so at the lack of common sense. I received one massage when teaching a clinic where the student testee tried to maintain contact with me while over-stretching to a far table. She ended up falling against the table, knocking over her oil, and breaking contact abruptly. It would have been much more acceptable to use a few light strokes to close a sequence, step away, get the oil, and reintroduce sequence contact using a few more light strokes.
If you will be giving many similar relaxation massages, I would suggest that you try to create a workable pattern as you work. If you use a similar sequence on each massage, you are less likely to forget to massage an area, and your smoothness will increase more naturally. Let’s look at the two broad categories of sequence movement: up and down, and side to side.
With an up and down sequence, the therapist usually starts on the back and neck, proceeds to one arm, and then the other, undraping and redraping as they go. The hip/gluteal area is worked next, followed by one leg and then the other, undraping and redraping as needed. The guest then turns over, the arms and hands are massaged, breasts and abdomen (if being worked), and finally one leg and the other, undraping and redraping as they go. Some therapists may prefer to start at the feet and work upward, but I feel this pattern is less sanitary, so I work top downward.

With a side to side sequence, the therapist usually starts with general work on the back and neck, and then redrapes the back. They then fold the sheet lengthwise, exposing and working- let’s say- the right shoulder, right arm, right gluteals and right leg. The right side is massaged- shoulder, arm, hips, legs in that order and the right side redraped. The sequence is then repeated on the left.
BODY MECHANICS
This is the use of proper body positions, movement, and leverage to produce the desired results more easily, and with a minimum of stress to the body. In general, this means 3 things to the beginner. 1. Use major muscle groups in your legs to move the BODY rather then the smaller arm muscles to move the arm or hand. 2. Keep your balance by not overreaching and keep your center of gravity as close as possible midway between your feet as possible. 3. Use a variety of strokes so that you do not overuse specific muscles by only doing the same movement for too long a time.
MASSAGE STROKES
There are six basic strokes in massage. You will be using three of them for this basic introduction: compression, effleurage and petrissage.
Effleurage - a lighter, smoothing stroke, it’s used to apply oil and warm the tissue before deep work, and to smooth out and give closure when ending work on an area.
Petrissage - kneading movements, to massage areas that are more tense
Compression - pressing of the surface tissue against underlying tissues, often to begin or close a session.
Friction - moving the skin over an area without moving the finger or hand from that spot on the skin
Percussion - also called tapotement: a tapping, slapping or light pounding of the body
Vibration - shaking of a body area, typically a limb
WORKING AN AREA
(We will refer to this frequently in the protocol. A full-body massage is really just a series of “Working an Area” segments repeated on different body areas of the body. The better you learn this pattern, the smoother your massages will become.)
When starting to massage an area, use effleurage in broad, light strokes to apply the oil and warm the tissues. Gradually increase the pressure for a minute or two until the tissue is warmed for any deeper work. Use petrissage- like kneading dough- to help reduce tension in any tighter areas that you feel. Close the sequence with effleurage to calm, smooth out, and drain the area, and then proceed to the next area. In short, you will be working “general to specific to general”. Think of the work on each body area as a “sandwich” of techniques: a smooth “slice” of effleurage on either side of a “filling” of heavier, more focused massage.
GIVING A SIMPLE, FULL BODY MASSAGE
Note: I am happy to provide this information for your enjoyment and satisfaction. Please realize, however, that you are using this information at your own risk, so use common sense. If in doubt about using a technique, don’t use it! Check-in with your recipient periodically about your pressure and their comfort level. If there is any discomfort, they should let you know so that you can adjust or stop your bodywork. If your recipient has any contraindications (see above), modify, postpone or refuse the massage.
Prep and warm-up- Leave the room. Have the recipient disrobe in private to their comfort level, lay on the table face down with their face in the cradle, and cover up to the neck with the top sheet. Check with the recipient to make sure they don’t have any contraindications to massage, or allergies to any of the ingredients in your oils. Working through the sheet, perform a series of gentle compressions using the palms of your hands stacked on each other- each about 3-5 seconds- over their whole body- neck to feet and back up to the neck. Don’t rush. Work smoothly. This allows them to settle in, start to relax, and get used to your your touch.
Back- Fold down the sheet to the waist. Pour a quarter-size puddle of oil in your hand, rub your hands together and gently apply the oil up and down their back using effleurage. If this is enough oil, proceed. If not, apply a little more. Perform steps in Working an Area on the whole back, avoiding direct pressure on the spine. Redrape the back.
Shoulder and arm- Fold down the sheet on a diagonal, exposing one shoulder and arm. Perform steps in Working an Area on the shoulder and arm. Gently stretch the arm. Return arm to the table. Redrape the back, fold down the drape exposing the other shoulder and arm, and repeat this sequence on the other side. Redrape back. PIC
Hips- Undrape leg up to the top of the hip or work through the sheet.

Perform compressions on the gluteals for 1-2 minutes using an open fist. Feel along the waistline for a bony bump a few inches from the outside edge of the body. This is the posterior, superior, iliac spine (or PSIS). Press on it for several seconds, release. Palpate the center of the buttock for another bony bump. This is the ischial tuberosity. Press on it for several seconds, release. Repeat on the other side.
Legs- Undrape the leg, exposing it up to the hip. Apply oil and perform steps in Working an Area on the leg, top to bottom. Pay particular attention to the hamstrings (back of upper leg) and calves (back of lower leg). Work the bottom of the feet. Redrape the leg. Repeat on the other leg. Gently stretch both legs downward.
Turn over and warm-up-
Have the recipient turn over so that they are face up with their head on the table, draped up to their neck. Working through the drape, perform open-fist compressions on legs and torso. Perform palmar compressions on the shoulders.
Arms- Undrape the arm and shoulder. Perform steps in Working an Area on the arm and shoulder. Work the fingers, gently stretching each. Gently stretch the arm. Return arm to the table. Redrape and repeat on the other arm and shoulder. Redrape.
Breasts and/or Abdominals- If you will be doing breast massage, slip sheet the recipient’s breasts with a hand towel. Undrape one breast. Perform fingertip “loading strokes” up towards the nipple, all around the breast, like spokes on a wheel, for 30 seconds. Perform fingertip “draining strokes” away from the nipple, all around the breast, like spokes on a wheel, for 30 seconds. Perform gentle massage of the whole breast for 30 seconds. Perform a 5 second long palmar compression. Redrape the breast. Repeat on the other breast. Redrape.
Fold down the drape a hand-width below the navel. Perform gentle, slow, effleurage around the abdominal area in a clockwise direction for 1 minute. Redrape the abdominal area. Slip sheet the breast towel and remove it.
Legs- Undrape the leg, exposing it up to the hip. Apply oil and perform steps in Working an Area on the leg, top to bottom. Pay particular attention to the quads (heavy muscles on the upper front of the leg) and the iliotibial band (ITB) on the outside of the upper leg, particularly halfway between the hip bone and the knee. Don’t be surprised if this area is uncomfortable for the recipient. Work the bottom of the feet. Redrape the leg. Repeat on the other leg. Gently stretch each leg downward.
Face and/or Scalp- If requested, perform gentle effleurage in tiny circles on the scalp, forehead and temples.

Perform a series of 7 fingertip compressions across the browline, working both sides, holding each for 5 seconds. Apply fingertip compression once on either side of the nostrils, and holding for 15 seconds.
Closure- Stroke the forehead several times with diminishing fingertip pressure for about a minute. Rest your hands on the forehead for about 10-15 seconds, gently removing your hands after that time. You have just completed your massage! Leave the room, allowing the recipient to get dressed in private. Be sure the recipient rises sloooowly so that they do not become faint as they sit up. Have the recipient drink plenty of water over the next few hours to flush the released toxins from the body.
GOOD LUCK!
I hope that you will enjoy giving and receiving massages and that this information will be of help for you to do so. Since I have summarized about 55 pages of instructions in about 6, these instructions will not be exhaustive, however, they are complete enough to let you give a nice relaxation massage to family and friends.

One way to improve your bodywork is to ask each recipient two questions after their session: what was the one best thing you did during the session, and what was the one thing you did that needs some improvement. If you have a question about a technique, don’t use that technique until the question is resolved: better to be safe than sorry.
If you have specific questions about technique, my opinions on various courses, topics, or equipment, or any other massage question, feel free to ask them by private mail and I will answer them as quickly as I can. Enjoy!

Most Helpful Opinions