 Girl's Behavior
  Guy's Behavior
  Flirting
  Dating
  Relationships
  Fashion & Beauty
  Health & Fitness
  Marriage & Weddings
  Shopping & Gifts
  Technology & Internet
  Break Up & Divorce
  Education & Career
  Entertainment & Arts
  Family & Friends
  Food & Beverage
  Hobbies & Leisure
  Other
Other  Religion & Spirituality
  Society & Politics
  Sports
  Travel
  Trending & News
 There comes a point in your life when you walk into a store and you see a tee shirt worth 25 bucks and you think “I can make that.” And ‘tis true, you sure can and it’s kind of easy.
What you will need:
• A tee shirt or any fabric that is washable and not affected by an iron.
• Freezer paper.
• Fabric paints (can get it at Michael's).
• A towel.
• A card board or magazine.
• Paint brushes.
• Blow dryer.
• Exacto knife (and maybe scissors).
1. First you will prepare all your materials. Turn on your iron it does not have to be super hot just hot enough. Lay out your tee shirt and where you want to paint it - for instance, if you want to put a logo on the heart of your shirt place a card board or magazine (that you don’t mind ruining) in between the painting side of your shirt and the other side so the paint wont bleed through and stain both sides, you can also tack the shirt to the card board to keep it still. Get your paints ready in a little tray. Print out or sketch the final picture that you want to transfer.
2. Next you will grab a sheet of freezer paper, enough to cover your design. With the shiny plastic side on the bottom pull your freezer paper on top of your desired design and sketch it onto the non shiny side of the freezer paper. Once done place the freezer paper on top of something you do not mind scratching (like a magazine) and cut out your design with an Exacto knife (easier than scissors) leaving attached areas if it’s intricate and has little pieces that you need that go off of the bigger picture.
3. Now that you have a stencil for your shirt position it on your shirt (shiny side down) and iron it onto your shirt. The shiny side should melt a bit and stick onto your shirt or fabric, don’t worry it peels off easy and it won’t ruin the fabric. Make sure not to peel it off yet or it may be a bit difficult getting it to stick again. And now that you have your stencil on your shirt paint away :]
4. Once you have painted on your design the colors you want grab your blow dryer and try to dry the paint a bit, until it is not so wet anymore. Once it is dry again you can paint on another coat. And once again dry it again. Once your picture is dry enough (not super stiff) carefully peel off the freezer paper making sure you are not dragging the paint you want on the shirt with it. Let it sit and dry for good and voila!
*Tip: To set it in well you can grab the towel and place it over the design and iron over the towel and shirt, the iron should be hot.
*Tip: Try not to wash the shirt anytime soon, I would give it a good 3-5 days or whatever the fabric paint instructs, and when you do wash it flip it inside out.
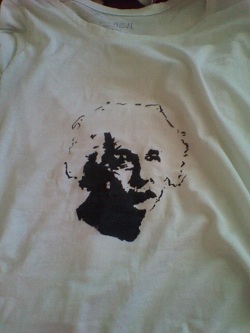
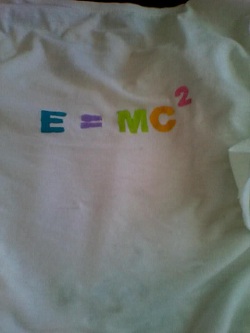
I have made myself some band shirts, a shirt with Einstein’s face and E=MC^2 on it, and I also made my buddy a nerdy shirt for her birthday (with her name “Kim” and the potassium K as the K in her name on it, with beakers and a DNA strand and other nerdy stuff).
Have fun!
What you will need:
• A tee shirt or any fabric that is washable and not affected by an iron.
• Freezer paper.
• Fabric paints (can get it at Michael's).
• A towel.
• A card board or magazine.
• Paint brushes.
• Blow dryer.
• Exacto knife (and maybe scissors).
1. First you will prepare all your materials. Turn on your iron it does not have to be super hot just hot enough. Lay out your tee shirt and where you want to paint it - for instance, if you want to put a logo on the heart of your shirt place a card board or magazine (that you don’t mind ruining) in between the painting side of your shirt and the other side so the paint wont bleed through and stain both sides, you can also tack the shirt to the card board to keep it still. Get your paints ready in a little tray. Print out or sketch the final picture that you want to transfer.
2. Next you will grab a sheet of freezer paper, enough to cover your design. With the shiny plastic side on the bottom pull your freezer paper on top of your desired design and sketch it onto the non shiny side of the freezer paper. Once done place the freezer paper on top of something you do not mind scratching (like a magazine) and cut out your design with an Exacto knife (easier than scissors) leaving attached areas if it’s intricate and has little pieces that you need that go off of the bigger picture.
3. Now that you have a stencil for your shirt position it on your shirt (shiny side down) and iron it onto your shirt. The shiny side should melt a bit and stick onto your shirt or fabric, don’t worry it peels off easy and it won’t ruin the fabric. Make sure not to peel it off yet or it may be a bit difficult getting it to stick again. And now that you have your stencil on your shirt paint away :]
4. Once you have painted on your design the colors you want grab your blow dryer and try to dry the paint a bit, until it is not so wet anymore. Once it is dry again you can paint on another coat. And once again dry it again. Once your picture is dry enough (not super stiff) carefully peel off the freezer paper making sure you are not dragging the paint you want on the shirt with it. Let it sit and dry for good and voila!
*Tip: To set it in well you can grab the towel and place it over the design and iron over the towel and shirt, the iron should be hot.
*Tip: Try not to wash the shirt anytime soon, I would give it a good 3-5 days or whatever the fabric paint instructs, and when you do wash it flip it inside out.
I have made myself some band shirts, a shirt with Einstein’s face and E=MC^2 on it, and I also made my buddy a nerdy shirt for her birthday (with her name “Kim” and the potassium K as the K in her name on it, with beakers and a DNA strand and other nerdy stuff).
Have fun!

Most Helpful Opinions