 Girl's Behavior
  Guy's Behavior
  Flirting
  Dating
  Relationships
 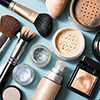 Fashion & Beauty
  Health & Fitness
  Marriage & Weddings
  Shopping & Gifts
  Technology & Internet
  Break Up & Divorce
  Education & Career
  Entertainment & Arts
  Family & Friends
  Food & Beverage
  Hobbies & Leisure
  Other
Other  Religion & Spirituality
  Society & Politics
  Sports
  Travel
  Trending & News
 Hey everyone. So a long while ago, I posted this take: Beauty 101: Tips and Tricks for Skincare and Makeup and I never followed it up as I said I would, until now, that is.
Regarding hair-care, my advice might be limited as I have fine, long, and straight hair so I can't easily recommend products for other hair types that I have no experience with, but hopefully, I can set you up with a guide on how to get started.
Enough chit-chat, let's get into it.
The Basics of Nail Care
Nails are something I really love. From regular manicures to ombres, to shaping an entirely new nail out of acrylic and gluing rhinestones on them and painting nail art, it can be a lot of fun while making you feel well-groomed and put together.
What's Your Nail Type?
Just like there's a skin type and hair type, there's also a nail type. Some people naturally have long and strong nails, while others have weaker and brittle nails that can't grow out much without breaking.
If you fall into the last category, do not fear. There are vitamins (biotin, for example) that you can take to strengthen your nails. In a few cases, having brittle nails can be a sign of a possible health problem (uncommon, but possible.) Nonetheless, ask your doctor/pharmacist for vitamin recommendations.
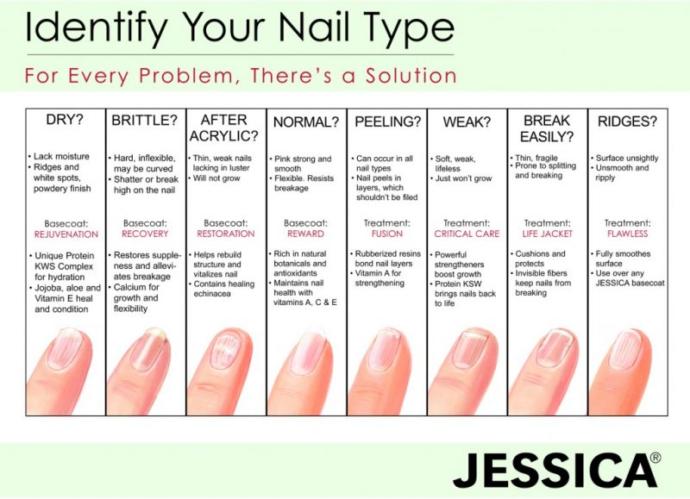
Tip: If you live in a colder/dry climate, make sure you moisturize and use nail oil (or coconut oil) to keep both your nails and cuticles moisturized and healthy.
Tip 2: Base coat is important. Even if you're not wearing colored polish, there are certain base coats that are designed to strengthen your nails while wearing it. If you find your nails are constantly chipping, putting a layer of a strengthening base coat on could reduce that.
Tip 3: If you're trying to grow out brittle nails, be especially careful after being in water for long. Your nails soften in water and it becomes easier for them to peel and chip once they're removed.
Tip 4: If your nails don't grow due to being a nail biter... There are a few things to do, first. If you bite subconsciously, there are polishes designed to stop nail-biting as you apply them onto your nail and they taste bitter so every time you go to bite them, you're reminded not to from the bad taste.
If you're a nail biter out of anxiety, then treat the source of the problem; the anxiety.
If you just get bored and do it, have something else nearby to distract you with, like a coin to play with to keep your fingers and mind busy.
Cuticle Care and Nail Shapes
Let's talk cuticles. Starting off with a common misconception; the cuticle and the eponychium.

See the thin layer of skin residing on the nail bed in the photo? That's the cuticle. That's the part that is okay to trim/push back. Now see the Eponychium slightly behind it? Some mistake that for the cuticle and trim it. DO NOT DO THIS! I'm writing in caps to stress it, because the eponychium fold is what prevents germs and bacteria from getting into the nail matrix (where new nail cells are created) Messing with the eponychium could result in inflammation and pain (I accidentally clipped it before, trust me, it hurts.) or worse, a nail infection. Be careful if you decide to scrape excess cuticle off too with an orange stick, as you don't want your hand to slip and dig under the eponychium either and let bacteria in. This is why it's bad to bite hangnails, they can rip into the eponychium and introduce mouth germs, causing a possible infection
Tip: Never try to chew off a hangnail, always bring a small nail clipper with you or wait until you get home to clip it off safely.
Before you clip or push or scrape a single thing, make sure you massage some kind of cuticle oil in to soften the skin. Removing cuticles can be difficult to explain over text, so I'm going to link a good tutorial of removal methods below:
Alright, cuticle intermission over. Let's move on.
Shaping Your Nails
To start off: I have a strong hatred against regular nail clippers. They can result in the tiny fibers in your nails being broken, which will weaken your nails. I've switched to using a glass nail file (You can find these at a beauty store or online, like Amazon.) Never file back and forth in a see-saw motion (if that even makes sense) as that too can break nail fibers. File in one direction, and one direction only.
If you have weaker nails, I wouldn't buff. But if you find the tops of your nails aren't even, a little bit of buffing doesn't hurt. Be gentle though.

Now it's time to choose your nail shape. As you can see, there are a lot of fun shapes you can do. I like squoval and stiletto square personally, but this is 100% up to you. File your nails into the desired shape and let us move on to the fun part; painting and nail art.
Let's Polish It Off and Call It Good
To start, I do the following:
1: Wash my hands.
2: Wipe my nail beds off with a cotton ball soaked in acetone to remove excess oils.
2: Apply a base coat, this is essential to prevent polish from staining your nails and to make your manicure last longer.
3: Allow the base coat to dry. Paint your nails the color of your choice. Allow it to fully dry, add a second coat of polish (and a third if it's a really thin, sheer polish.) Let it dry completely, then top it off with a top coat, making sure to get all the edges and cap off the tip of your nail to prevent it from chipping early on.
The secret to getting a perfect polish job is practice. I remember the first times I painted my nails, it wasn't pretty, to say the least. It's not an easy thing to do, especially when you have to use your non-dominant hand to paint. Don't get discouraged though, with a little practice, you'll be golden.
Top Coat is just as important as base coat and even the colored polish itself. Topcoat seals in the polish and leaves it either shiny or matte, depending on the kind you buy. Without a topcoat, you can expect your manicure to chip much faster, which isn't something we want. I love the top coat by Seche Vite. It's honestly the best one I've ever tried and makes my polish hold up a lot longer than they usually would.
There are dozens of different polishes on the market to choose from nowadays from various price ranges. Sinful Colors is a good brand (and personally my favorite) that runs relatively cheap ($2-3 dollars a bottle), though it doesn't hold up as well as something more expensive like OPI or Sally Hanson or ORLY but with the right top coat (Seche Vite, for example) it can hold up just as long in my experience:
Opaque polish: This is your regular, run of the mill, classic polish. In two coats, the color is opaque and a solid color.
Sheer polish: This is a lighter, thinner formula. You can usually see the natural nail through this polish, which means if it chips, it won't be as noticeable as it would be on opaque polish.
Glitter polishes: These have pieces of glitter in them, per their name. You can get ones with tiny pieces of glitter to use over an opaque polish for a touch of glam, or buy a chunkier polish with big pieces to use by itself. If you're going to use it by itself, I'd recommend putting a layer of it onto the nail bed, then taking a small disposable makeup sponge, applying a layer onto it and dabbing it onto the nail bed, this will result in more glitter pieces and less clear polish getting onto your nail, making it easier to get an opaque layer.
Matte polishes: These are what they sound like; matte. They have no shine to them. You can buy matte polishes on their own, or buy a matte top coat to turn any opaque polish you currently own into a matte polish.
Gel polishes: There are two types. Gel polish that requires a UV light (which you can buy online) to dry, and Gel Miracle polish by Sally Hanson that doesn't require a UV light. Honestly, I've used both and I don't notice a huge difference. Maybe the UV light ones hold up a tiny bit longer but they're close in comparison.
For application, this is a good video on how to evenly and beautifully apply polish:
Tip: If you get any polish on your skin/cuticles, use a small brush or q-tip dipped in acetone to carefully wipe it off.
Nail Art
The nail art world has exploded over the recent few years. Google '3D nail art' if you want to see some cool stuff. From painting designs with a tiny brush, or gluing beads, sculptures and decals to your nails, the options are endless.
Tip: Don't use Topcoat or base coat to glue on rhinestones and whatnot; this is something I've seen done before and it's not a great idea as they'll fall off easily. Get a nail glue instead from a brand like Kiss.
Nail-stickers are also fun. If you don't want to pain tiny designs, you can buy stickers and stick them on, apply a top coat, and you're set.

The Basics of Acrylic and Gel
These are two types of artificial nails. Acrylic nails are something I've done at home a few times before. They look pretty and hold up well, but do be prepared for your nails to take some damage if you go this route. If you need a strong, long-lasting manicure though, these are good options.
Getting them professionally done can be time-consuming and expensive. It won't end there either, your nails will grow out and you'll have to get them filled in again as you'll see the nail bed peeking through at the bottom. They're difficult to do at home, mostly due to the sculpting of the nail and trying to get the acrylic even, but not impossible. You can buy kits and practice if you don't mind damaging your nails.
Gel nails are more flexible and tend to look more natural. Personally, I prefer acrylics since they're thick and hold up better in my opinion, but it's totally up to you which to get if you go this route.
You nailed it!
Yes, pun intended. I hope this was able to help you with doing a perfect at-home manicure. Now that you have beautiful nails, let's talk hair.
The Basics of Hair Care
Alongside makeup, skin, and nails, I also love hair. I've had long hair my whole life and it's my statement piece by now, you can do so many fun things with it so long as you have the right tools.
Let's talk hair types first.
To start, let's talk about if you have oily, dry, or normal hair. If you have oily skin, you might find your hair is also oily. Or if you have dry skin, you might find you have drier hair, though this isn't a 100% sure thing, just an observation of mine. You can have a mix of these too. Such as your hair is normal during the summer and drier in winter, or your hair is oily in winter and dry in spring, it's common for your hair to go through changes during the year.
In these cases, you might find you need to switch out products, such as if your hair is normal during summer, leave it be and do your usual routine and during the winter, incorporate heavier conditioners and hair oils/frizz serums.
Oily hair is exactly what it sounds like. Your scalp gets oily soon after washing it, your hair usually appears limp and you might have a lot of dandruff, as, despite popular belief, dandruff is usually caused by an excessively oil scalp rather than a dry scalp.
How do you deal with this particular hair type? Well, I have some experience as this is the one I have, or rather had as after I dyed my hair, it's a bit more complicated but that's beside the point. Just like with skin, if you overwash your hair to counter the oiliness, you might be causing your scalp to produce even more oil as it's trying to compensate for the constant loss of oil. Instead of washing your hair every day as you might be doing, I'd try to stretch it out to every other day, to every 2-3 days. I used to wash my hair every day and I definitely noticed this increased oil production. It'll take a few weeks but you might find your hair adjusts to the less frequent washing and the oil will decrease.
It's important to have a good quality dry shampoo too, especially when you're trying to retrain your scalp. I recently started using L'Oreal Paris Hair Care Advanced Hairstyle Longwear Dry Shampoo and I'm pretty pleased with it.
For shampoo, I like anything by OGX or Matrix Biolage collection, but there are thousands of shampoos out there so if you find those don't work, do not fear: https://www.prevention.com/beauty/hair/g20633437/shampoos-for-oily-hair/
Conditioner. You might be tempted to skip this if you have extremely oily hair, but I wouldn't advise that. Personally, I do think everybody should use some kind of conditioner or oil, even if it's a very light one to avoid weighing down your hair much. The ends are the driest part of your hair, so just using a dime size on the very ends can be beneficial in the long run.
A few tips to decrease oil: Avoid using conditioner on your scalp. Avoid touching your hair with your hands a lot, as this will transfer the oil from your hands to your hair. If you find you're really struggling with oil, you might want to give apple cider vinegar a try to balance your scalp's pH levels. https://coconutsandkettlebells.com/apple-cider-vinegar-hair-rinse/
Dry hair is also exactly what it sounds like. Your hair will feel dry to the touch, and it'll be prone to breakage and split ends. It might also often be frizzy. After I dyed my hair ombre, it seemingly turned to this texture where I had dyed it. To counter it, I started the less frequent washes as I mentioned. I also started using heavier conditioners (I sound like an ad but Matrix is my go-to.) as well as using straight up oil on it. I'd coat it in coconut oil once a week, braid it overnight and wash it out in the morning. This especially helps my hair and has made it a lot softer and it has stopped breaking off as much. Deep conditioning treatments are also a must with this hair-type in my experience. It's also good to avoid heat as much as possible as these further suck the moisture out of your hair.
Figure out how often you need to wash it too, as some people with dry hair go a week+ between washes in order to keep it healthy.
For this type, I'd use a light shampoo, preferably one with some kind of oil in it. I like using products like Silk Infusion by Chi and a small amount of argan oil through it.
If you don't already, I'd start detangling it in the shower too. I'd recommend this to anybody, but especially to those with dry hair. As in, bring a comb into your shower, slather your hair with conditioner and then detangle. The conditioner makes it a lot easier to get through and it'll decrease the amount of breakage.
Normal hair is exactly what it sounds like as well. It's neither too dry nor is it too oily. It's a healthy balance. Using moderate shampoos and conditioners like ones by OGX/L'oreal/Nexxus is usually good, though if your current products seem to be working fine, then keep doing what you're doing. This applies to all hair types, if you find a product that works, stick with it.
Hair Textures are also important when it comes to choosing products. There are three categories here. Fine, coarse, and medium.
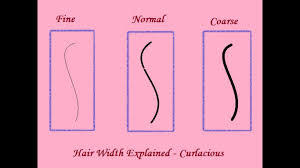
Take a strand of hair between your fingers and rub it. If you can barely feel it, you likely have fine hair. If it feels like a thread, you likely have coarse hair. If it feels in between, as in you can feel it but it's not thick like a thread, you likely have medium hair.
Fine hair tends to not like holding curls/styles and gets tangled easily and weighed down by products easily, so do be careful with applying hair oil and products, as well as heavy conditioners.
Coarse hair can be frizzy, rough and dry (as can any other hair type) but this one tends to be more prone to it. Be generous with the hair serums and oils, and consider co-washing (washing your hair with just conditioner and skipping the shampoo every now and again)
Note: There's a difference between thick hair and coarse hair. Words like 'fine' and 'coarse' refer to the strand circumference. 'Thick' and 'Thin' refer to the hair density. It's possible to have coarse hair yet low hair density, resulting in thin hair, and fine hair yet high hair density, resulting in thick hair.
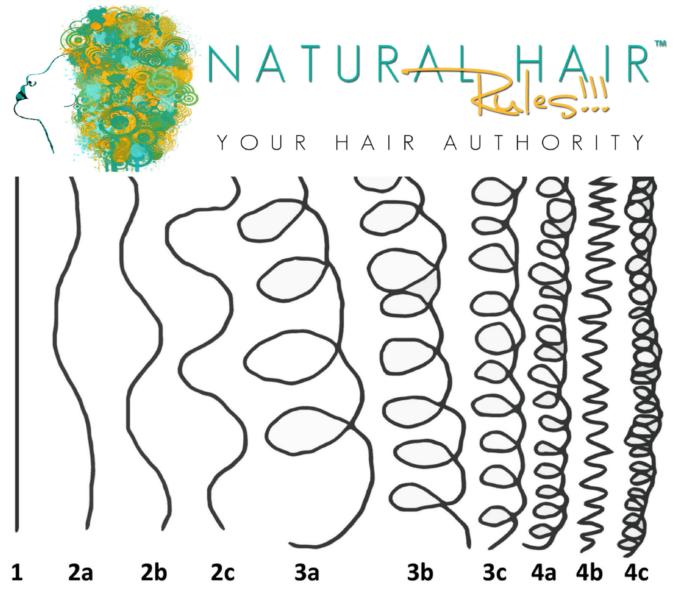
Let's talk further about hair types, as this will play a role in choosing products. Somebody with straight (type 1 hair) probably won't want to use the same curl enhancing serum somebody with curly (type 3a hair) would use. You can have a mix of these types too, and a lot of people do. Some naturally, some due to damage. Like I have type 1 (straight) hair for the most part but due to damage, it has some 2a and 2b in certain sections.
On Hairstyles...
You know how certain eyebrow shapes and makeup looks flatter certain face/eye shapes? The same goes for hair. Depending on your face shape, certain styles will look better than others.
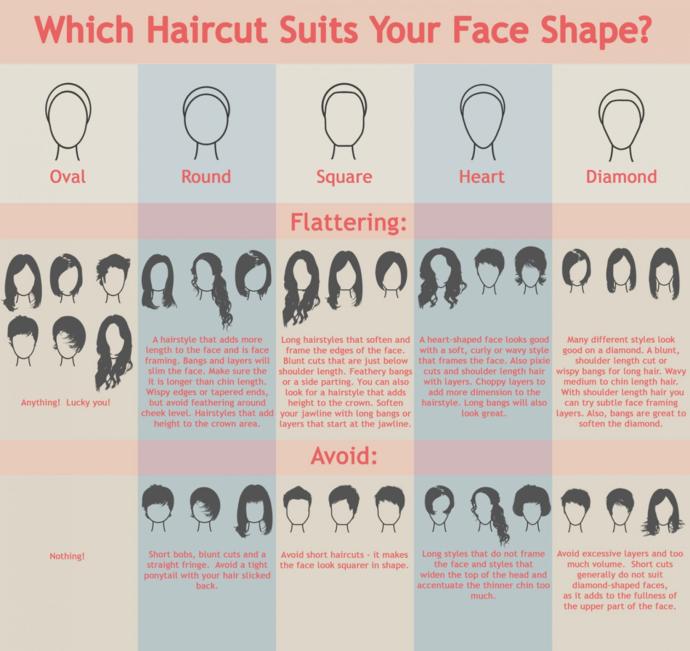
Hair takes time. If you're looking for some fun styles that don't require heat or too much time, I'd give braiding a try. From fishtails to dutch braids, you can have a lot of fun. These styles might look intimidating in the beginning, but once you practice them a few times, they become much easier. With YouTube, you can learn all sorts of different braiding techniques.

A few final notes...
If you use heat on your hair often (this includes blowdrying your hair often): Make sure you're using a heat protectant to decrease damage, though, in the long run, it'll eventually damage it anyway. Heat protectant will slow it down though.
Wearing your hair up in ponytails and tight styles often can lead to breakage and thinning around the hairline. If you're noticing this, give your hair a bit of a break and wear it down. If you have dark hair and need to wear it up but are dealing with thinning of the hairline, you can use a bit of eyeshadow and a fluffy brush to fill in thin spots and make it look full again.
Styling before bed is important too. If you're prone to breakage or tangly hair, I'd braid it in a loose 3 strand braid to keep it untangled and less likely to break when you're tossing and turning throughout the night.
Pillowcases are important too. If your hair is frizzy/curly, you might benefit from a silk pillowcase.
Use Keratin mists to promote hair strength (biotin vitamins also promote this.)
I think that covers mostly everything I wanted to say about the subject. If you have any questions, feel free to ask in the comments and I'll try to answer them. Thanks for reading and good luck with finding the right routine for you!

Most Helpful Opinions